Photography

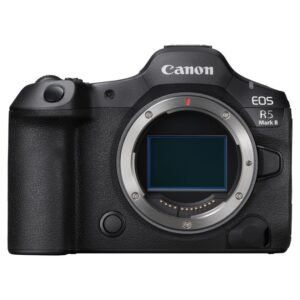
Canon EOS R5 Mark II Review

The Canon EOS R5 Mark II takes the flagship mirrorless experience to the next level, building on the success of its predecessor with notable upgrades that cater to both professionals and advanced enthusiasts.
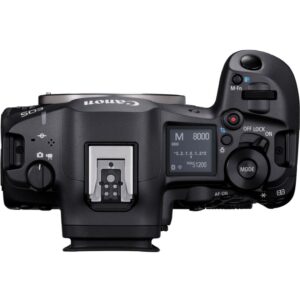
Key Specs:

  • Sensor: 45 MP full-frame CMOS
  • Processor: Dual DIGIC X
  • ISO Range: 100-51,200 (expandable to 102,400)
  • Video: 8K/60p RAW, 6K ProRes, 4K/120p
  • Autofocus: Dual Pixel CMOS AF II with AI-driven subject tracking
  • IBIS: 8 stops of in-body image stabilization
  • Connectivity: Wi-Fi 6E, Bluetooth 5.2
  • Battery Life: Approx. 570 shots (LCD)
  • Storage: Dual card slots (CFexpress & SD UHS-II)

What It’s Good For:

  1. High-Resolution Still Photography: The 45 MP sensor delivers exceptional detail, making it ideal for genres like landscape photography, where capturing intricate textures and expansive scenes is critical. It’s equally suited for portrait photography, offering outstanding color depth and natural skin tones. The high resolution also benefits commercial and studio photographers who require large prints or heavy cropping.
  2. Wildlife and Sports: The advanced AI-driven autofocus, capable of tracking humans, animals, and vehicles, paired with a fast burst rate, ensures sharp images even in fast-paced scenarios. Wildlife photographers will appreciate the camera’s ability to track moving subjects like birds in flight with remarkable precision.
  3. Professional-Grade Video: With internal 8K/60p RAW and 6K ProRes, it’s a powerhouse for videographers needing cinematic quality. The 4K/120p option is perfect for slow-motion effects, making it a versatile choice for content creators.
  4. Low-Light Scenarios: Thanks to its wide ISO range and in-body stabilization, the R5 Mark II performs admirably in low-light environments, making it suitable for event photography, astrophotography, and handheld shooting in dimly lit conditions.
  5. Hybrid Shooters: For those who need a single camera capable of excelling in both stills and video, the R5 Mark II provides a seamless blend of features that make switching between modes effortless.

What It’s Not So Good For:

  1. Overheating in Extended 8K Recording: While improved, overheating can still occur during prolonged high-resolution video recording.
  2. Battery Life: Moderate performance means extra batteries are a must for extended shoots.
  3. Price: At the premium end of the spectrum, it may not be justifiable for casual users or those who don’t need its advanced features.
  4. File Sizes: High-resolution photos and 8K video consume a significant amount of storage, requiring investment in fast, high-capacity cards.

Comparison with the EOS R5:
For potential buyers considering an upgrade, the Canon EOS R5 Mark II offers several key improvements over its predecessor:

  • Processor: The R5 Mark II features a Dual DIGIC X processor, enhancing overall performance, including faster image processing and improved noise reduction at higher ISOs.
  • Video Capabilities: While the original R5 maxed out at 8K/30p, the Mark II introduces 8K/60p RAW and 6K ProRes, giving videographers more options for high-quality recording.
  • Autofocus: The AI-driven autofocus system in the Mark II is more advanced, offering improved subject recognition and tracking, especially for dynamic scenes.
  • Connectivity: Wi-Fi 6E and Bluetooth 5.2 replace the older connectivity options, ensuring faster and more stable wireless transfers.
  • Stabilization: While the original R5 had excellent IBIS, the Mark II pushes stabilization to 8 stops, making handheld shooting even more reliable.
  • Thermal Management: Canon has addressed overheating concerns with better thermal management, allowing for longer recording times in high-resolution video modes.

Verdict:
The Canon EOS R5 Mark II is a versatile, high-performance tool for professionals seeking cutting-edge features in both photography and videography. Its strengths make it particularly suited for landscape, portrait, wildlife, and hybrid shooting scenarios. While it comes with a hefty price tag and minor limitations in certain use cases, it’s an excellent choice for those who demand the best from their gear.

The Art of Minimalist Photography: Creating Impact with Less

Minimalist photography embraces simplicity, focusing on clean compositions and a reduced number of elements to create visually striking images. By eliminating distractions, you can highlight your subject and evoke powerful emotions with less.

1. What is Minimalist Photography?

Minimalism in photography involves emphasizing a single subject or a small group of elements within a composition. It often uses negative space, clean lines, and simple textures to create balance and draw attention to the subject. This approach encourages viewers to focus on the essentials of the image without being overwhelmed by details.

2. Key Principles of Minimalist Photography

  • Simplicity: Remove unnecessary elements from your frame. Each component should serve a purpose, contributing to the story or aesthetic.
  • Negative Space: Utilize empty areas in your composition to emphasize your subject. Negative space adds breathing room and directs focus.
  • Contrast: Highlight your subject using color, light, or texture contrast. A bright subject against a dark background or a smooth object on a rough surface can create visual intrigue.
  • Geometry and Patterns: Incorporate simple shapes, lines, and repetitive patterns to create harmony and structure within your frame.

3. Techniques for Minimalist Photography

  • Careful Composition: Use compositional tools like the rule of thirds or centered framing to position your subject effectively. Experiment with symmetry for a balanced look.
  • Selective Focus: Blur the background using a wide aperture (low f-number, such as f/2.8) to isolate your subject and simplify the scene.
  • Monochrome Approach: Black-and-white photography naturally enhances minimalist compositions by removing the complexity of color.
  • Look for Minimalist Scenes: Seek out environments with minimal clutter, such as open landscapes, urban architecture, or plain walls.

4. Post-Processing for Minimalism

Post-processing can refine your minimalist images:

  • Increase contrast to make the subject pop.
  • Desaturate or use selective color to reduce visual distractions.
  • Crop your image to eliminate extraneous elements and enhance focus.

Minimalist photography proves that less is more. By simplifying your compositions and focusing on the essentials, you can create images that captivate viewers with their elegance and clarity. This style not only challenges you to see the world differently but also enhances your storytelling abilities as a photographer.


This guide should help you explore the art of minimalism and add a fresh perspective to your photography!

Tilt-Shift Photography: Creating Miniature Scenes and Controlling Focus

Tilt-shift photography is a fascinating technique that allows photographers to manipulate focus and perspective in creative ways. Known for its ability to create the illusion of miniature scenes, tilt-shift photography also excels in architectural and landscape shots by correcting distortions and enhancing depth of field.

1. What is Tilt-Shift Photography?

Tilt-shift photography uses a special lens that can tilt (change the plane of focus) and shift (adjust perspective) relative to the camera’s sensor. These unique adjustments let you:

  • Create Miniature Effects: By tilting the lens, you can blur portions of the image, mimicking the shallow depth of field seen in close-up photography, even in wide scenes.
  • Correct Perspective: Shifting the lens is invaluable for architectural photography, as it prevents the distortion of vertical lines, ensuring buildings appear straight.

2. Creating Miniature Scenes

The hallmark effect of tilt-shift photography is making real-life subjects look like tiny models. Here’s how to achieve it:

  • Find the Right Scene: Overhead or high vantage points work best, as they mimic the perspective of looking down at a miniature model.
  • Tilt the Lens: Slightly tilt the lens to create selective focus, blurring the top and bottom of the frame while keeping the middle sharp.
  • Enhance in Post-Processing: Adjust colors and contrast to amplify the toy-like feel, as brighter, saturated tones often complement the miniature effect.

3. Using Tilt-Shift for Architecture and Landscapes

In addition to creative effects, tilt-shift lenses are practical tools for precise photography:

  • Perspective Correction: Use the shift function to straighten converging vertical lines when photographing tall buildings.
  • Extending Depth of Field: By tilting the lens, you can keep both foreground and background elements in sharp focus, ideal for expansive landscapes.

4. Alternatives to Tilt-Shift Lenses

If you don’t have access to a tilt-shift lens, you can simulate the effect:

  • Post-Processing: Use software like Photoshop or Lightroom to blur selected areas and mimic the miniature look.
  • Adapters: Affordable tilt-shift adapters can add functionality to existing lenses, providing a budget-friendly way to experiment.

Tilt-shift photography is both a technical and artistic tool that unlocks new creative possibilities. Whether you’re crafting whimsical miniature scenes or achieving perfect architectural precision, mastering tilt-shift techniques will elevate your photography to the next level.


I hope this guide inspires you to explore the world of tilt-shift photography!

How to Shoot High-Speed Action: Techniques for Freezing Motion

Capturing high-speed action requires a combination of the right settings, timing, and techniques to freeze motion effectively. Whether you’re photographing a speeding car, a leaping athlete, or splashing water, mastering these methods ensures sharp and dynamic shots.

1. Shutter Speed: The Key to Freezing Motion

The shutter speed is the most critical setting for action photography. A fast shutter speed reduces the time the camera’s sensor is exposed to light, effectively freezing moving subjects. Here’s how to adjust:

  • Use a shutter speed of 1/1000 or faster for fast-moving subjects like sports or wildlife.
  • For slower movements, such as walking or dancing, speeds around 1/500 may suffice.
  • Experiment with even faster speeds, like 1/2000 or 1/4000, for ultra-fast action, such as splashes or bird wings in flight.

2. Adjusting ISO and Aperture

Since fast shutter speeds limit the amount of light entering the camera, you’ll need to adjust the ISO and aperture to compensate:

  • Increase ISO: Boosting ISO makes the sensor more sensitive to light. While higher ISO settings can introduce noise, modern cameras handle noise well up to ISO 1600–3200 or higher.
  • Open the Aperture: Use a wide aperture (low f-number, such as f/2.8 or f/4) to let in more light. This also creates a shallow depth of field, helping your subject stand out against the background.

3. Focus Mode and Techniques

Fast-moving subjects require precise focusing. Use these settings for best results:

  • Continuous Autofocus (AI Servo or AF-C): This mode tracks moving subjects, ensuring they stay in focus.
  • Focus Points: Use a group of focus points or the center point for accuracy when tracking erratic movements.
  • Pre-Focus: For predictable action, pre-focus on a spot where the subject will move through, like a finish line.

4. Burst Mode for Multiple Shots

Enable your camera’s burst mode (continuous shooting) to capture a sequence of images in rapid succession. This increases the likelihood of getting the perfect shot during moments of peak action.

5. Stabilize Your Camera

To reduce camera shake and ensure sharpness:

  • Use a tripod or monopod for heavy telephoto lenses.
  • If handheld, enable image stabilization (IS/VR), though this is less critical with fast shutter speeds.

By combining fast shutter speeds, appropriate ISO and aperture settings, precise focusing, and strategic planning, you can effectively freeze motion in high-speed action shots. With practice, you’ll be able to capture dynamic moments with clarity and impact, creating images that tell compelling stories.


I hope this guide helps you perfect your high-speed action photography skills!

Understanding Color Temperature: How to Use Warm and Cool Light in Photography

Color temperature is a fundamental concept in photography that affects the mood, tone, and overall feel of your images. By understanding how to work with warm and cool light, you can create photos that evoke specific emotions or tell a more compelling story.

1. What is Color Temperature?

Color temperature refers to the hue of light, measured in Kelvin (K). It determines whether the light appears warm (yellow/orange) or cool (blue). For instance:

  • Warm Light: Found in sources like candlelight (about 1,900K) and sunsets (around 3,000K). Warm light creates a cozy, inviting atmosphere.
  • Cool Light: Seen in overcast daylight (6,500K) or shade (7,500K+). Cool light feels clean, crisp, and sometimes moody.

2. Using Warm Light in Photography

Warm tones are ideal for evoking feelings of comfort, nostalgia, or intimacy. Here are some tips for utilizing warm light:

  • Golden Hour: The soft, golden light during sunrise and sunset adds warmth and enhances skin tones, making it perfect for portraits and landscapes.
  • Artificial Light: Use incandescent bulbs or candles for a warm glow in indoor shots.
  • Adjust White Balance: If shooting in neutral light, set your white balance to a lower Kelvin value (e.g., 3,000K) to emphasize warm tones.

3. Using Cool Light in Photography

Cool light is excellent for creating a sense of calm, mystery, or drama. To make the most of cool tones:

  • Shade and Overcast Conditions: Use the natural bluish tint of cloudy days for soft, diffused lighting.
  • Artificial Light: Fluorescent lights and LED panels often produce cooler tones, suitable for urban or minimalist scenes.
  • White Balance Adjustment: Increase the Kelvin setting (e.g., 7,000K) to amplify cool tones in your photos.

4. Balancing Warm and Cool Light

Sometimes, a mix of warm and cool light can add depth and interest to your images. For example:

  • In portrait photography, use warm backlighting to highlight your subject while keeping cool ambient light in the background.
  • In landscapes, juxtapose the warm tones of a sunset with the cooler shadows for dramatic contrast.

Understanding color temperature enables you to manipulate the emotional impact of your photos. By consciously choosing warm or cool light—or a mix of both—you can elevate your photography and craft images that resonate with your audience.


This guide should help you use color temperature creatively to enhance your images!

Infrared Photography: Unlocking a Surreal World with Invisible Light

Infrared photography allows you to capture a world beyond the visible spectrum, transforming ordinary scenes into surreal, dreamlike landscapes. By focusing on infrared (IR) light, which lies just beyond the visible range, you can create striking images with glowing foliage, dark skies, and an ethereal quality that feels otherworldly.

1. What is Infrared Photography?

Infrared photography captures light that human eyes cannot see. This involves wavelengths between 700 and 900 nanometers, which are just outside the visible spectrum. While our eyes perceive infrared as invisible, digital sensors or specialized film can record it, revealing a hidden layer of reality. In IR photography:

  • Green foliage appears white or bright due to high IR reflectance.
  • The sky often turns dark, providing dramatic contrast.
  • Skin takes on a smooth, porcelain-like texture.

2. Equipment Needed

To get started with infrared photography, you’ll need the following:

  • IR-Converted Camera: A digital camera modified to block visible light and allow infrared light to pass. Converting an older DSLR or mirrorless camera is a popular option.
  • IR Filter: If you prefer not to modify your camera, an IR filter like the Hoya R72 can be attached to your lens. These filters block visible light while allowing IR wavelengths through, but they require longer exposure times.
  • Tripod: Since IR filters often reduce light significantly, a tripod is essential for steady, long-exposure shots.

3. Shooting and Processing Infrared Images

Infrared photography requires some adjustment in shooting and post-processing techniques:

  • Composition: Look for scenes with lots of foliage, water, or skies, as these elements react dramatically to IR light.
  • Exposure: Infrared light behaves differently than visible light, so you may need to experiment with your camera’s exposure settings to find the best results.
  • Post-Processing: Most IR images need editing to achieve the desired effect. Converting your image to black-and-white or performing a color swap can enhance the surreal qualities.

Infrared photography offers a fascinating way to explore unseen dimensions of light. With the right tools and a bit of experimentation, you can create otherworldly images that stand out for their unique beauty and creativity.


This introduction to infrared photography should inspire you to dive into the invisible world of IR light!

The Magic of Macro Lighting: Using Ring Lights and Diffusers for Close-Up Shots

Macro photography allows you to capture incredible detail in small subjects, revealing textures and features that often go unnoticed by the naked eye. However, lighting is one of the biggest challenges in macro photography due to the close distance between your camera and subject. The right lighting can make a dramatic difference in bringing out those fine details and textures. Two of the most effective tools for lighting macro shots are ring lights and diffusers, both of which can help you create beautifully lit, close-up images.

1. Why Lighting is Critical in Macro Photography

In macro photography, you’re often shooting at very close distances, which means less natural light reaches your subject. This can result in dark, underexposed images or harsh shadows if not managed properly. Additionally, with small subjects, you want even, soft lighting to highlight fine details and avoid unflattering shadows that can obscure the very textures you’re trying to capture.

This is where specialized lighting tools, like ring lights and diffusers, come into play.

2. Using Ring Lights for Macro Photography

A ring light is a circular light that attaches around your camera’s lens, providing even, shadow-free lighting for close-up shots. Because the light source surrounds the lens, it illuminates your subject from all angles, which is ideal for macro photography where shadows can be distracting.

Benefits of Ring Lights:

  • Even Lighting: Ring lights provide a uniform glow across your subject, reducing harsh shadows and ensuring that every detail is evenly illuminated.
  • Soft Shadows: When shadows do appear, they are soft and subtle, enhancing the three-dimensional quality of your subject without overpowering it.
  • Ease of Use: Ring lights are simple to attach and use, making them a practical solution for macro photographers.

When to Use Ring Lights: Ring lights are perfect for subjects where you want to emphasize detail without creating dramatic lighting effects. They work well for small objects like jewelry, insects, flowers, and textured surfaces, ensuring every part of your subject is well-lit.

3. Diffusers: Softening the Light for Natural Results

While ring lights offer great lighting, sometimes their direct brightness can be a little too harsh, especially on reflective or shiny subjects. That’s where diffusers come in. A diffuser softens the light source, spreading it more evenly over your subject, resulting in a more natural and less harsh appearance.

Types of Diffusers:

  • Clip-On Diffusers: These attach directly to your flash or ring light, softening the light before it hits the subject.
  • Portable Softboxes: For more control, portable softboxes can be used to diffuse external lights or flashes, offering a professional look without harsh highlights.

Benefits of Diffusers:

  • Softer Light: Diffusers spread the light evenly, creating a more flattering and natural look on your subject.
  • Reduces Harsh Highlights: When shooting reflective surfaces or shiny subjects, diffusers prevent overblown highlights and help retain detail.

When to Use Diffusers: Diffusers are especially helpful for macro shots of reflective or shiny surfaces, such as glass, metallic objects, or water droplets. They also work well in outdoor macro photography to soften the sunlight or reduce the glare from other light sources.

4. Combining Ring Lights and Diffusers for Perfect Macro Lighting

For the best results, you can combine both ring lights and diffusers. Use the ring light to provide a consistent light source and add a diffuser to soften the light further, avoiding overexposure and harsh reflections. This combination gives you the perfect balance of brightness and softness, ensuring that every detail is visible while maintaining a natural look.


In macro photography, lighting is everything. By using ring lights for even, consistent lighting and diffusers to soften the light, you can capture stunning, detailed close-ups that showcase your subject in the best light possible. Whether you’re photographing tiny insects, intricate textures, or small products, these lighting tools will help you bring out the magic of the macro world.

Photographing in Low Light: Techniques for Reducing Noise and Maintaining Detail

Low light photography presents a unique challenge for photographers, often resulting in noisy images or loss of detail. Capturing clear, sharp images in dim conditions requires a balance of camera settings and techniques to minimize noise and maintain quality. Whether you’re shooting indoors, at dusk, or in low-lit environments, these tips will help you master the art of low light photography while preserving detail.

1. Use a Low ISO to Minimize Noise

ISO controls your camera’s sensitivity to light. While increasing ISO allows you to brighten an image in low light, it also introduces more noise. Noise manifests as grainy textures that reduce image quality and detail. To avoid this, always aim to keep your ISO as low as possible—usually around 100 or 200—and compensate with other settings like aperture and shutter speed to let more light into your camera.

If you do need to raise your ISO in extremely dark conditions, modern cameras can handle moderately high ISOs (around 800 to 1600) without generating excessive noise. Be cautious, though—higher ISOs will still result in some noise, especially in shadows and dark areas.

2. Use a Wide Aperture

Opening up your lens’s aperture allows more light to hit the sensor, which is crucial in low light scenarios. A wide aperture (low f-stop number like f/1.8 or f/2.8) is ideal for shooting in dim environments as it lets in the maximum amount of light. This helps you maintain lower ISO settings and faster shutter speeds, reducing the chances of introducing noise or motion blur.

However, be mindful that a wide aperture reduces the depth of field, so focus carefully to ensure your subject is sharp while the background blurs out softly.

3. Slow Down the Shutter Speed (But Avoid Camera Shake)

In low light, you can use a slower shutter speed to allow more light into the camera. A longer exposure time (such as 1/30 or 1/15 seconds) can brighten your image without raising the ISO. But there’s a trade-off—using a slower shutter increases the risk of motion blur or camera shake, especially if you’re handholding your camera.

To minimize camera shake, use a tripod whenever possible. This will stabilize the camera, allowing you to shoot with slower shutter speeds while keeping the image crisp and detailed. If you don’t have a tripod, try bracing your camera on a steady surface or using your body to stabilize it as much as possible.

4. Shoot in RAW for Maximum Flexibility

When photographing in low light, always shoot in RAW format. RAW files contain more data than JPEGs, which gives you greater flexibility in post-processing. You’ll be able to recover details from shadows and adjust exposure without significantly degrading the image quality. RAW files also provide better control over noise reduction in editing, allowing you to smooth out unwanted grain without sacrificing fine details.

5. Use Noise Reduction in Post-Processing

Even with the best techniques, some noise is inevitable when shooting in low light. Thankfully, you can reduce noise during post-processing. Most editing software, such as Adobe Lightroom or Photoshop, includes noise reduction tools. Apply noise reduction sparingly to smooth out grainy areas while preserving as much detail as possible.

Be cautious with noise reduction—overdoing it can lead to a loss of sharpness and fine details, resulting in a soft or plasticky appearance.

6. Leverage Artificial Light

When natural or ambient light isn’t enough, consider introducing artificial light sources. Using a flash, portable LED light, or even a handheld phone light can help illuminate your subject without cranking up the ISO. For softer, more flattering light, try bouncing your flash off a wall or ceiling or using a diffuser to avoid harsh shadows.


Shooting in low light may seem tricky, but with the right techniques, you can capture stunning, noise-free images that retain all their detail and sharpness. By managing your camera settings effectively and making use of available light, you’ll be able to master the challenges of low light photography.

Lens Distortion Explained: How to Minimize and Correct Distortion in Your Images

Lens distortion is a common optical issue that can warp the appearance of your photos, bending straight lines or altering shapes. While some distortion can add artistic flair, it can also detract from the realism of your image. Understanding the causes of lens distortion and how to minimize or correct it can help you achieve more accurate, professional-looking photos. In this post, we’ll break down the different types of lens distortion and provide tips for fixing them.

1. What Is Lens Distortion?

Lens distortion occurs when the lens warps the image, causing straight lines to curve or objects to appear unnaturally stretched. This is a result of the way light is bent (refracted) as it passes through the lens. The severity of distortion often depends on the type of lens, the focal length, and how close you are to your subject.

There are three main types of lens distortion:

  • Barrel Distortion: This occurs when straight lines appear to bulge outward, like a barrel. It’s most common in wide-angle and fisheye lenses.
  • Pincushion Distortion: In contrast, pincushion distortion makes straight lines bow inward, resembling a pinched-in shape. This is often seen in telephoto lenses.
  • Mustache Distortion: A more complex form of distortion, mustache (or complex) distortion is a combination of barrel and pincushion distortion, creating a wavy effect. It’s less common but can occur in zoom lenses at certain focal lengths.

2. Minimizing Lens Distortion During Shooting

While you can’t always avoid lens distortion, there are steps you can take to minimize its impact when shooting:

  • Choose the Right Lens: Wide-angle lenses tend to introduce more barrel distortion, while telephoto lenses often cause pincushion distortion. Choosing a lens with minimal distortion for your type of photography can help. Standard prime lenses (like 50mm) generally produce little distortion.
  • Step Back and Zoom In: The closer you are to your subject, the more distortion you may notice, especially with wide-angle lenses. Stepping back and using a longer focal length can help reduce the distortion effect.
  • Center Your Subject: Lens distortion is often most noticeable toward the edges of the frame. Keeping your main subject in the center of your image where distortion is least likely to occur can help preserve its proportions.
  • Shoot with a Higher Aperture: Using a smaller aperture (higher f-stop number) can increase the sharpness across the frame, reducing some of the effects of distortion, particularly near the edges.

3. Correcting Lens Distortion in Post-Processing

Even if you can’t avoid distortion during the shoot, post-processing software can help you correct it. Here’s how:

  • Use Lens Profiles in Lightroom or Photoshop: Both Adobe Lightroom and Photoshop have built-in lens correction tools that automatically apply corrections based on your lens model. These profiles are designed to fix common distortion issues like barrel or pincushion distortion. To use it, go to the “Lens Correction” panel and enable “Profile Corrections.” Select your lens from the list, and the software will apply the appropriate fix.
  • Manual Correction in Photoshop: If automatic corrections aren’t enough, you can manually adjust distortion in Photoshop. Under the “Filter” menu, select “Lens Correction.” From there, you can fine-tune the amount of barrel or pincushion distortion using sliders to achieve the perfect result.
  • Correcting Perspective Distortion: If you’re shooting with a wide-angle lens and notice vertical lines (like buildings) leaning inward or outward, you can use the Transform or Upright tool in Lightroom to straighten them out. This is especially helpful for architectural photography.

4. Creative Uses of Lens Distortion

While distortion is often something photographers want to avoid, it can be used creatively. For example, barrel distortion can add drama to landscape or action shots, giving them a dynamic, wide-angle perspective. Fisheye lenses, which produce extreme barrel distortion, are often used for artistic, ultra-wide shots with a unique perspective. Understanding when and how to use distortion intentionally can add a creative element to your photography.


Lens distortion is a natural part of photography, but by understanding how it works, you can minimize its impact or even correct it in post-processing. Whether you aim to eliminate it for clean, professional images or embrace it for creative effect, mastering lens distortion helps you have more control over the final result of your photos.